Server load balancing using Sophos UTM
It isn’t widely known that Sophos UTM (formally known as Astaro ASG) is also able to provide load balancing. It can be used to load balance a lot of services, or can act as a simple HA option for a service. In this item I will explain how to use it to publish and load balance a website using Sophos UTM 9.

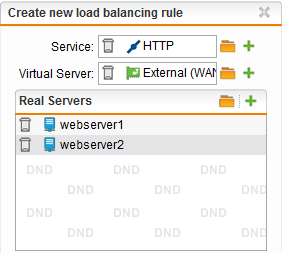
On the webadmin page, go to network protection → Server Load Balancing. Click on New Load balancing rule. Add the service HTTP, and drag the external WAN address object to Virtual server. In real servers just add the web servers hosting the website. If you want to balance the load between both servers, the websites need to be identical on both of them. If you just want a HA option this isn’t necessary. You could even use the second web server as a sorry temporarily unavailable site which will appear as soon as the main web server goes offline.
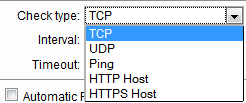
There are several ways for the UTM to monitor if the load balanced service is still available on a server. The most simple one is a TCP or UDP port check. This is done though a connection establishment check on the specified TCP or UDP port.
Ping the host to check availability and for web services It’s possible to check with a HTTP of HTTPS request, this can be either with or without the hostname. (e.g. index.html or http://www.site.com/index.html)

The other settings are pretty straightforward, Interval is the interval between checks in seconds and timeout is the time span in which the servers need to respond before they are considered offline.
Next setting is a check box for automatic firewall rules, checking this creates the packet filter rules to allow any host to communicate to the service. Remember that if you check this, packets won’t show up in the logging files. Rule logging can be quite useful for trouble shooting purposes. If you don’t want the service to be publicly available or want to be able to enable logging, you’ll have to manually create the packet filter rule. Checking Shutdown Virtual Server Address will shutdown the additional address interface if the last server becomes unavailable. This won’t work if the service is on not on an additional address interface like in this example.
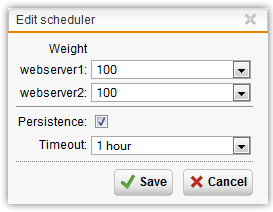
Next are the weight distribution settings, these are accessible in the real servers box by clicking on the wrench (hover text Edit scheduler.)

The load (weight) is distributed through a round robin algorithm, which can be adjusted using a weight number. The weight can be set from 0 to 100, and the values are relative to the other servers. If one server has a weight of 100 and the other 50. The first one with the 100 weight is going to get 2/3 of the traffic and the other with the 50 weight 1/3. There is no specific high availability option in these settings. But with 2 web servers, one with a weight of 100 and another with a weight of 0, effectively gives you a HA solution with an active/passive configuration. The weight of 0 means that this server will get no traffic unless it’s the only server left online. You could also have 3 web servers, 2 with a weight of 100 sharing the load of requests. And third server to host a temporarily unavailable page and configured with a weight of 0. You’ll have a HA load balanced site with a maintenance page.
The other setting is the persistence, this could be important if there are authenticated sessions. At this time only a time based persistence is possible using this kind of server load balancing. Persistence based on cookies can be done using the web application firewall, but that will be another blog. The persistence can be configured from 1 minute to 5days. The best setting depends on the service you’re load balancing. For a simple website with authenticated sessions I would choose a setting just above the session time-out of the web server itself. e.g. if the sessions on the site time out after 20 minutes, I would choose a persistence of 1 hour in UTM.

Save and enable the rule.

That’s it, now you have a load balanced website.
Stay tuned, there will be more posts on load balancing.
